
UPDATE 07/16/2020 - Video showing using the jig to flash this controller
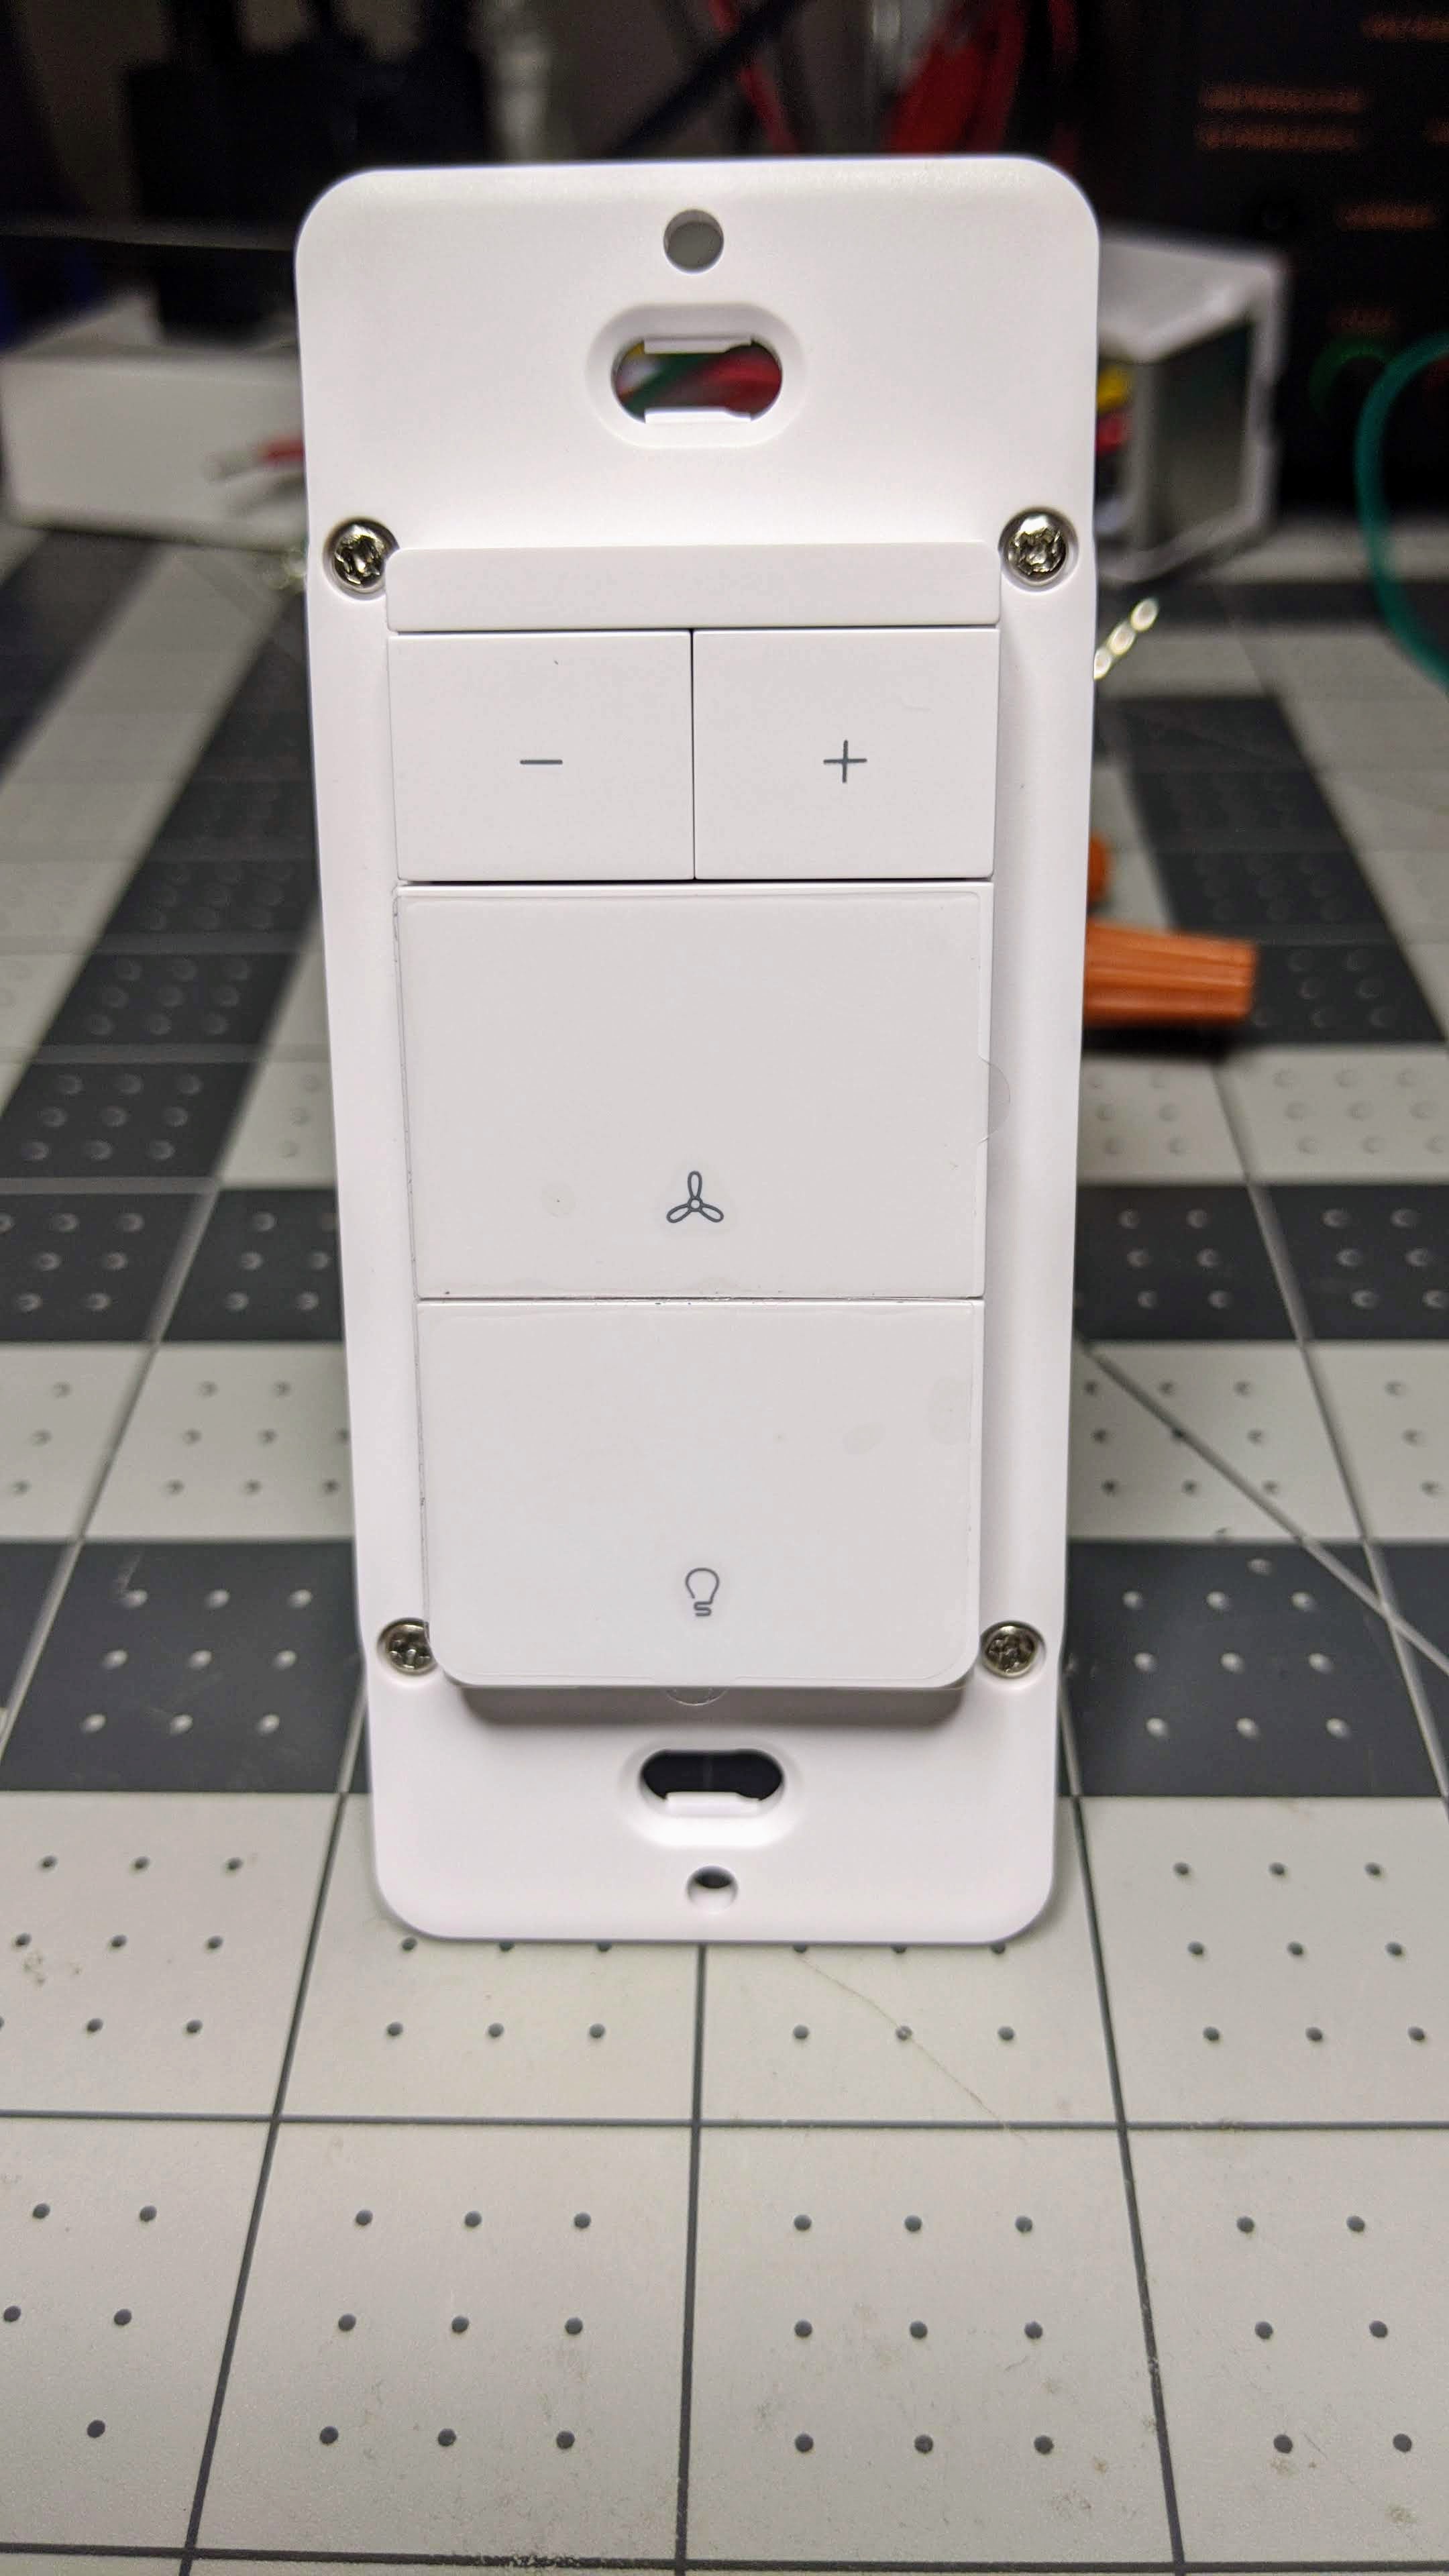
Esmlfe/Treatlife DS03 Fan Controller and Light Dimmer
I've done several projects with the Sonoff iFan03 and various Martin Jerry dimmers to make my own fan controllers that work via Home Assistant while also following my rule of "never removing functionality while adding functionality" in a smart home. The setup is challenging with replacing fan capacitors for 120vac based fans, dimmer rules, iFan rules, etc. I've always been looking for a drop in fan controller that was not Zwave or Zigbee based. Treatlife finally came out with a device that answers all of this and more!
The Treatlife/Esmlfe 2 in 1 Fan Controller and Light Dimmer is currently priced comparatively with other Zwave fan controllers that only have fan controls. Available on Amazon
A live stream is available showing the device - View Live Stream on digiblurDIY
The switch will work with the Tuya Smartlife cloud app if you want to ride dangerously but as of this article if you attempt to use it via the Home Assistant Tuya integration, the dimmer and fan control entities will not show up. So how do we control it? We flash it with Tasmota of course! Keep it all local control without the cloud! Unfortunately, at this time these devices are shipping with Tuya firmware that is blocking the current TuyaConvert exploit. The switch will need to be flashed via the old school manual method. Don't worry, this is fairly simple.
Disconnect any power going to the device! Remove the 4 screws and the face plate will come off. There are no ribbon cables or wires to worry about.
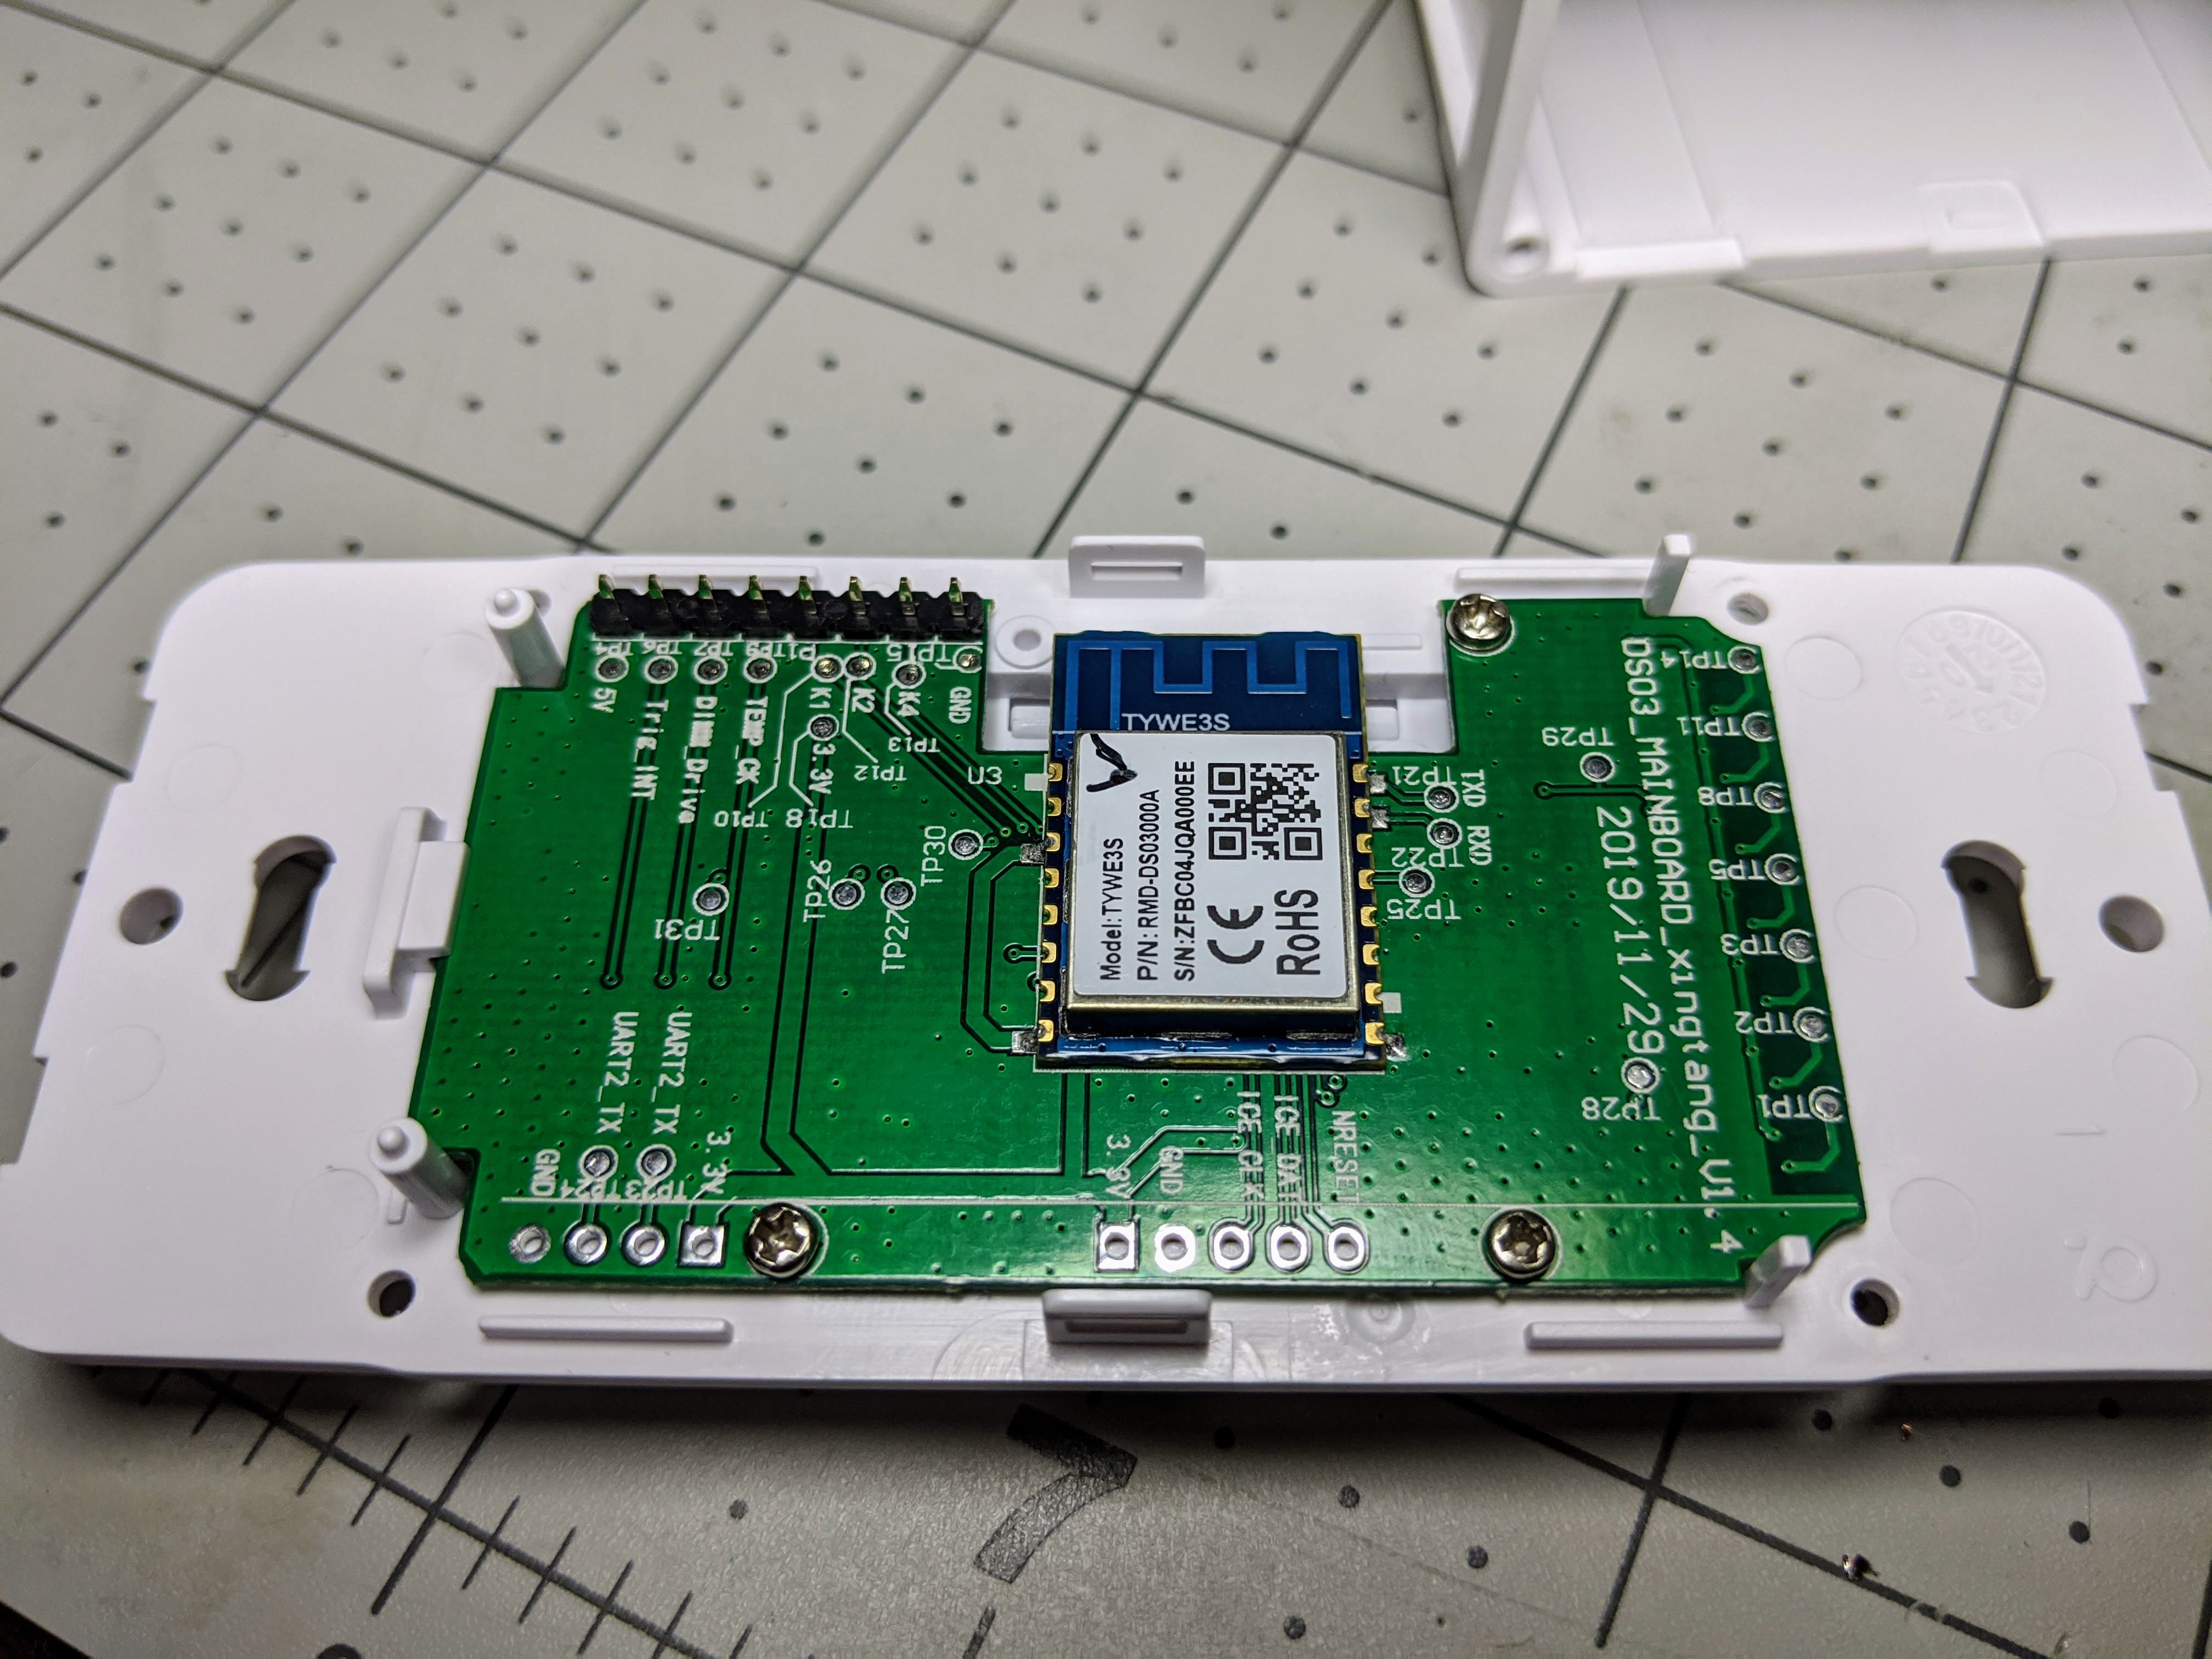
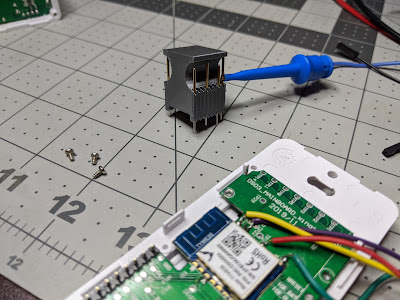
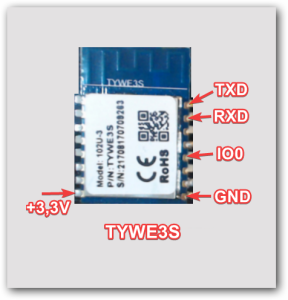
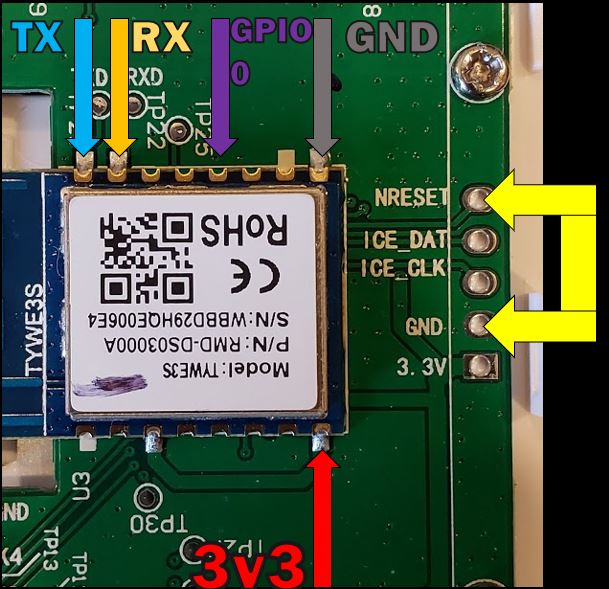
The TYWE3S module containing the flash-able ESP8266 chip is wide out in the open. There are multiple choices you can use to flash this chip with the 3v3 and GND headers. Using a TTL USB adapter, you need to connect the following wires: 3v3 (do not use 5 volts!), Ground, RX, and TX. GPIO 0 will also need to be attached to ground to enable flash mode on an ESP8266. Instead of soldering, if you have a 3D printer you can also make a pogo pin jig as shown here and below. Remember that RX goes TX and TX goes to RX on the USB TTL adapter.
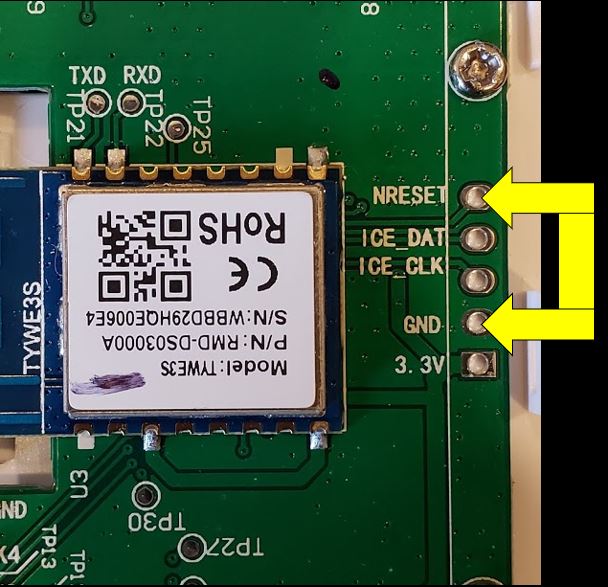
Also, note you will need to put a jumper between NRESET and GND locations. This keeps the secondary TuyaMCU in a reset loop during the flashing of Tasmota. Without this jumper the flashing process will not work.
Once you've connected the necessary wires to your USB TTL device you can utilize Tasmotizer to flash the chip. Additional information available on flashing Tuya devices can be found here in the Tasmota Wiki
Once flashed, disconnect GPIO 0 so it will boot up into Tasmota. You need to scan the WiFi access points with a phone, laptop, or tablet. You should see a tasmota-xxxx or similar named WiFi access point. Connect to this AP, accept any messages about no internet connectivity if your device prompts you, this is normal. Browse to 192.168.4.1 if it does not open the Tasmota page automatically. Click scan, select your home WiFi network and enter the password for your network. Check the box show password to make sure you have the password correct. Save the settings. The Fan controller should now be on your network. You can look on your router or WiFi attached devices and find the IP address of the device. Browse to this IP address to complete the rest of the Tasmota setup.
It's all down hill after this... click the Console button on the Tasmota GUI of the fan switch. Issue the following commands. Take note it will restart during many of the commands, wait for the console to somewhat settle down before issuing the next one.
module 54
backlog so97 1 ; tuyamcu 11,1 ; tuyamcu 12,9 ; tuyamcu 21,10
backlog ledtable 0 ; dimmerrange 10,1000 ; so59 1 ; so68 0
There is a configuration choice to decide; by default the fan speed can be changed while the fan is off and it will not turn on. This can be a good or bad thing depending on your choices. Pick the Rule Set you like (you can change it later by simply copy and pasting the rule back into the console)
Add the following rule, this should be all on ONE line in the Tasmota Console on the Switch.
(SELECT ONE)
OPTION A: Does NOT turn the fan on when the speed/preset is changed:
Rule1 on TuyaReceived#Data=55AA03070005030400010016 do publish2 stat/%topic%/speed 3,0 endon
on TuyaReceived#Data=55AA03070005030400010117 do publish2 stat/%topic%/speed 3,1 endon
on TuyaReceived#Data=55AA03070005030400010218 do publish2 stat/%topic%/speed 3,2 endon
on TuyaReceived#Data=55AA03070005030400010319 do publish2 stat/%topic%/speed 3,3 endon
OPTION B: The fan turns on when the speed/preset is changed:
Rule1 on TuyaReceived#Data=55AA03070005030400010016 do backlog power1 1 ; publish2 stat/%topic%/speed 3,0 endon on TuyaReceived#Data=55AA03070005030400010117 do backlog power1 1 ; publish2 stat/%topic%/speed 3,1 endon on TuyaReceived#Data=55AA03070005030400010218 do backlog power1 1 ; publish2 stat/%topic%/speed 3,2 endon on TuyaReceived#Data=55AA03070005030400010319 do backlog power1 1 ; publish2 stat/%topic%/speed 3,3 endon
Enable the rule with the following
Rule1 1

You can then add the necessary MQTT configuration, device name, etc and it should be safe to disconnect the wires, reassemble the switch and install it on the wall, on mains AC power to the fan. You might be asking at this point "how do I control the fan speed from the GUI?" You will need to utilize the following commands to send the fan speeds on the console
TuyaSend4 3,0 (fan speed 1)
TuyaSend4 3,1 (fan speed 2)
TuyaSend4 3,2 (fan speed 3)
TuyaSend4 3,3 (fan speed 4)
You can also send those over MQTT if you like from various automations using cmnd/topic/tuyasend4 with a payload of 3,0 , etc.
Home Assistant Configuration
If you already have a "fan" and "light" section do not duplicate these sections in your Configuration YAML file. Don't forget to change the "yourtopic" topic to the MQTT topic configured in your fan switch MQTT page of Tasmota from the previous steps
As of 2021.4 Home Assistant MQTT Fan has changed (thanks to @merdely for the help):
fan:
  - platform: mqtt
    name: "Your Fan"
    qos: 1
    state\_topic: "stat/yourtopic/POWER1"
    command\_topic: "cmnd/yourtopic/POWER1"
    availability\_topic: "tele/yourtopic/LWT"
    percentage\_state\_topic: "stat/yourtopic/speed"
    percentage\_value\_template: '{{ ((value | replace("3,","")) | int + 1) \* 25 }}'
    percentage\_command\_topic: "cmnd/yourtopic/tuyasend4"
    percentage\_command\_template: "3,{{ ((value | int - 1) / 25) | int }}"
    preset\_mode\_state\_topic: "stat/yourtopic/speed"
    preset\_mode\_value\_template: '{{ value | replace("3,0", "turtle") | replace("3,1", "low") | replace("3,2", "medium") | replace("3,3", "high") }}'
    preset\_mode\_command\_topic: "cmnd/yourtopic/tuyasend4"
    preset\_mode\_command\_template: '{{ value | replace("turtle", "3,0") | replace("low", "3,1") | replace("medium", "3,2") | replace("high", "3,3") }}'
    preset\_modes:
      - "turtle"
      - "low"
      - "medium"
      - "high"
    payload\_available: "Online"
    payload\_not\_available: "Offline"
    payload\_on: "ON"
    payload\_off: "OFF"

light:
  - platform: mqtt
    name: "Your Light"
    state\_topic: "tele/yourtopic/STATE"
    state\_value\_template: "{{ value\_json.POWER2 }}"
    command\_topic: "cmnd/yourtopic/POWER2"
    availability\_topic: "tele/yourtopic/LWT"
    brightness\_state\_topic: "tele/yourtopic/STATE"
    brightness\_command\_topic: "cmnd/yourtopic/Dimmer"
    brightness\_scale: 100
    brightness\_value\_template: "{{ value\_json.Dimmer }}"
    payload\_on: "ON"
    payload\_off: "OFF"
    payload\_available: "Online"
    payload\_not\_available: "Offline"
Old Configuration for HA 2021.3 and earlier kept for documentation purposes
fan:
  - platform: mqtt
    name: "Bedroom Fan"
    state\_topic: "stat/treatfan/POWER1"
    command\_topic: "cmnd/treatfan/POWER1"
    speed\_state\_topic: "stat/treatfan/speed"
    speed\_command\_topic: "cmnd/treatfan/tuyasend4"
    availability\_topic: "tele/treatfan/LWT"
    payload\_available: "Online"
    payload\_not\_available: "Offline"
    payload\_on: "ON"
    payload\_off: "OFF"
    payload\_low\_speed: "3,1"
    payload\_medium\_speed: "3,2"
    payload\_high\_speed: "3,3"
    speeds:
      - low
      - medium
      - high

light:
  - platform: mqtt
    name: "Bedroom Light"
    state\_topic: "tele/treatfan/STATE"
    state\_value\_template: "{{ value\_json.POWER2 }}"
    command\_topic: "cmnd/treatfan/POWER2"
    availability\_topic: "tele/treatfan/LWT"
    brightness\_state\_topic: "tele/treatfan/STATE"
    brightness\_command\_topic: "cmnd/treatfan/Dimmer"
    brightness\_scale: 100
    brightness\_value\_template: "{{ value\_json.Dimmer }}"
    payload\_on: "ON"
    payload\_off: "OFF"
    payload\_available: "Online"
    payload\_not\_available: "Offline"

That's it! Enjoy! If you need help feel free to pop into Discord and ask for a hand.
Treatlife/Esmlfe 2 in 1 Fan Controller and Light Dimmer
Discord - https://discord.gg/bNtTF2v
Patreon - https://www.patreon.com/digiblurDIY
YouTube Channel - https://www.youtube.com/digiblurDIY
Links to products provided through the Amazon Affiliate program.